The Best Phone Plan for International Travel in 2024
One of the biggest dilemmas we’ve faced when traveling generally involves finding the best phone plan for international travel. It’s also one of the questions we get asked most frequently. Whether you’re traveling across Europe for 10 days or you’ve decided to live outside of your home country, the idea of staying connected matters.
You want to make sure you can reach your friends and family back home, or your Airbnb host upon arrival. And you want to have access to Maps or to the Internet to browse the best restaurants and shops. But you also want to make sure you’re not overpaying for the service.
That combination of reliable connectivity and affordability took us a long time to find, but we’re so happy we did. For us, the solution over the past two years has been Airalo – a marketplace for eSIM cards all around the world.
Benefits Of An eSIM
An eSIM stands for “embedded SIM card”, and it’s the core component of the Airalo travel phone plan. Essentially, it serves the same purpose as the traditional SIM card you would insert on your phone. But, in the case of Airalo, rather than being a physical card, it’s all done online. So, why exactly does this make it the best phone plan for international travel:
Saves Time
When we lived in Serbia, we had to recharge our travel phone plan every month. Given the tech challenges, it just wasn’t possible for us to do it online or over the phone. Put bluntly, this translated into a huge waste of time – especially if we decided to travel elsewhere in Europe and had to find yet another vendor for a new SIM. With Airalo, all we have to do when we run out of funds or need a new plan is get a new card online. We can do it directly through their app, and we’re up and running in minutes – regardless of the location.
Keeps Your Primary Number
The other problem with purchasing a local SIM card in-country is that you can’t use the data from the local provider at the same time as your primary number. This means having to choose between using data for things like googling or streaming or keeping your primary number active for messages and calls. With Airalo, that’s certainly not the case. You actually get to use your primary number for calls and messages while at the same time getting data and internet service directly from your eSIM.
Saves Money
And if you do want to be able to use your primary number when you’re abroad, then you have to rely on roaming services from your local provider at home. Though prices have gotten better, it is still quite expensive, even if you’re able to get some sort of customer service “deal”. On the other hand, Airalo offers data plans at near-local prices. The cost depends on the location you choose, the amount of data you want to use, and the amount of time you want it to be valid, but prices can be as low as $5 per eSIM. They are also prepaid and don’t automatically renew, meaning you will only be charged for the plan you buy, without any hidden fees.
Makes It Easy To Switch
Travel phone plans get even more complicated when it involves traveling across multiple countries. In our case, we switch countries every month, so it would be very complicated to switch SIM cards and find new vendors every time. Through Airalo, we can switch between local, regional, or international data plans. So we can have a SIM only for Switzerland, or we can choose to have one for Europe as a whole if we know we’ll be stopping in multiple countries throughout the course of the month. They have hundreds of different options, ranging in price, length, and destination, making it super easy to choose and in our opinion, the best phone plan for international travel.
How To Use This Travel Phone Plan
Most packages offered by Airalo are only for data. This means that you won’t have access to call and text services through them but you will have full access to data. Put simply, they won’t be giving you a local number for calls or texts. However, you can use popular apps like FaceTime, iMessage, WhatsApp, Viber, and Skype to text or make calls since they’ll still be linked to your primary number.
Or if you have a plan that offers free international text messages, then you can still receive texts to your primary number, while relying on the Airalo service for all data purposes.
Step 1: Make Sure Your Device Supports eSIM
The first thing you’ll want to check is that your phone is unlocked. This means that your phone is not under a contractual obligation with a provider and that you are free to use any SIM plan with it. If you aren’t sure, the best thing to do is contact your carrier to confirm.
The second thing is to make sure your device supports eSIM. The technology is fairly new, so it won’t work with older phones. Here is the full list of supported devices.
Step 2: Choose The Best Plan For You
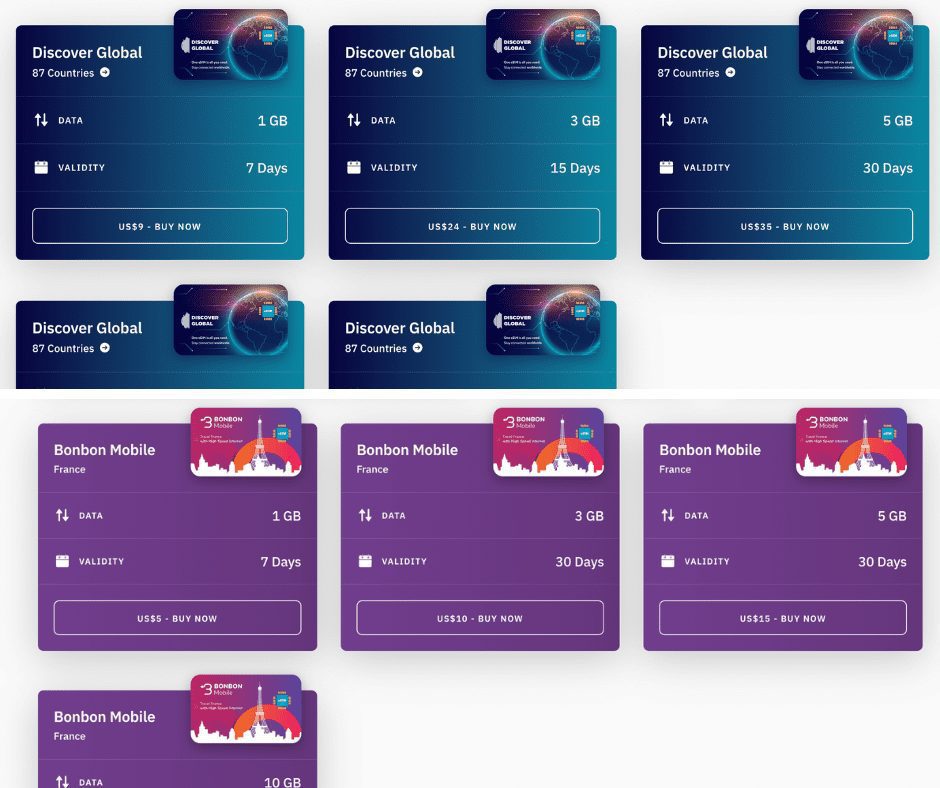
Airalo offers data packages for over 190 countries and regions. You’ll first want to decide whether you want a travel phone plan for a single country, like France, Thailand, or South Africa, or whether you want a regional eSIM that can work across Europe or Asia. You can even opt for a global eSIM that will work in 87 countries. You can find all the different plans here. You’ll notice regional options are slightly more expensive than local ones but truly worth it if you’re planning on hopping around during your trip.
Then, you’ll want to choose the amount of data you want to have available. Packages generally vary between 1 GB, 3 GB, 5 GB, or 10 GB. This will depend on how often you plan to use your phone without WiFi while abroad, but you’ll be able to easily check how much you have leftover anytime you like.
Lastly, you’ll want to choose the validity of the service. This will vary depending on how long you’ll need the data, but most options are 7 days or 30 days.
Step 3: Install Your eSIM
The easiest way to purchase your travel phone plan is by downloading the Airalo app. Once you do, you will receive an email with your order summary, a “How To” video, and an “Install eSIM” button. You can also find a detailed installation guide for both IOS and Android here. Since I have an iPhone, I’ll be highlighting that step-by-step process below.
A couple of things to note before you start the process: 1) make sure you have a stable WiFi connection; 2) most eSIMs can only be installed once, so if you remove one of them from your device, you won’t be able to install it again; and 3) you can install your eSIM at any point, but it won’t be activated until you arrive at the destination and turn it on, so you won’t have to worry about losing days or data if you choose to install it prior to your trip.
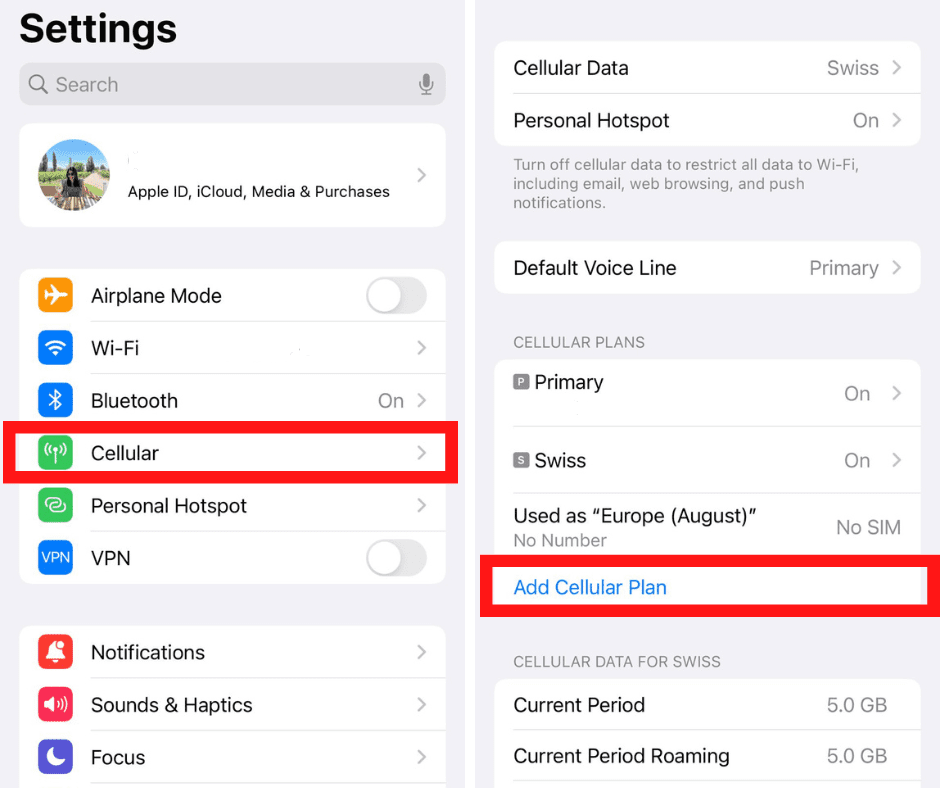
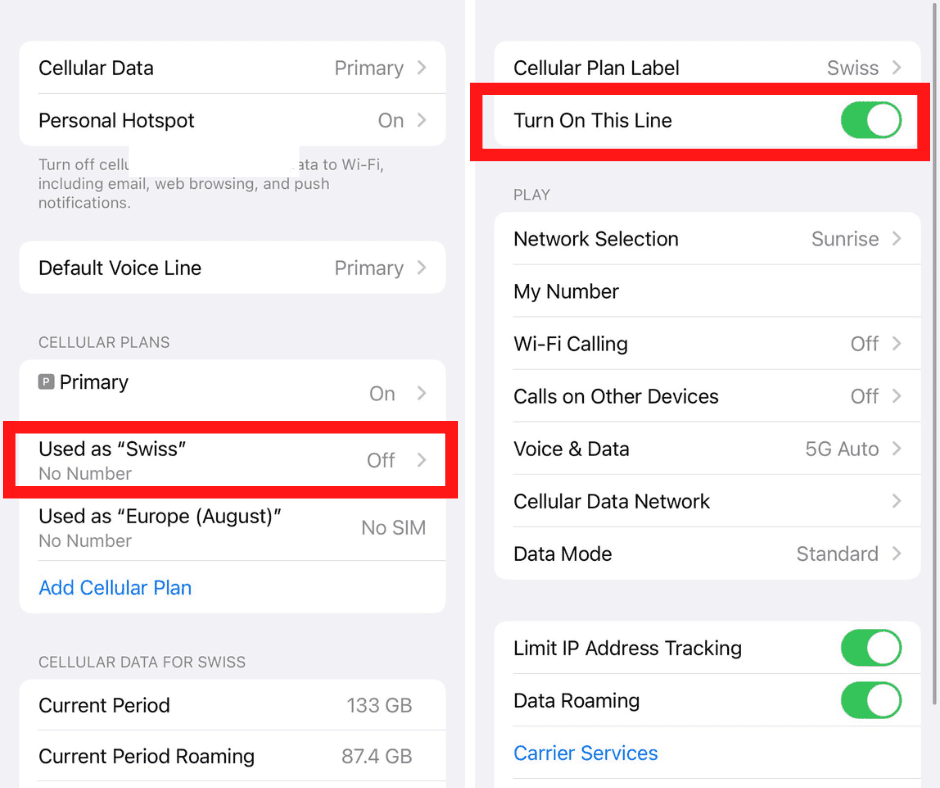
The first thing you’ll want to do is add your new cellular data plan, which you can find under Settings > Cellular > Add Cellular Plan. In the screenshot below as an example, you can see your primary number, the eSIM I’m currently using labeled “Swiss” and an old Airalo eSIM labeled “Europe (August)”.
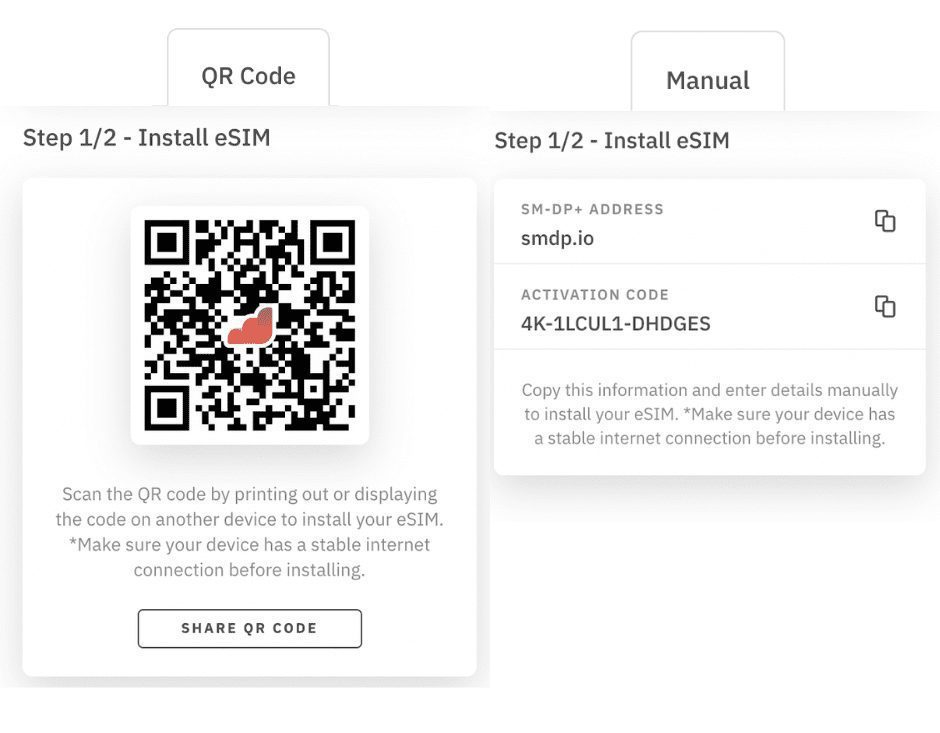
Once you click on Add Cellular Plan, you’ll be able to either scan the QR code you’ll receive from Airalo or you can manually input the eSIM details provided (SM-DP+Address and Activation Code). You can find those on your Airalo account, under My eSIMS > Choose eSIM you want to install > Choose your installation option.
Afterward, make sure to label your eSIM so they’re easy to track. This is especially important if you plan on using several cards. My go-to is simply the destination and perhaps the month if I know I’ll be using that same location often.
Step 4: Select Your Preferences
You’ll then want to move on to select your preferences within the travel phone plan. This means choosing what phone number you want to use and what service you want to use for data.
Default Line: First, you’ll set your primary line as your default line. Your “primary” plan is already imputed into your phone and it’s your main phone number, which you will continue to use for calling and sending messages.
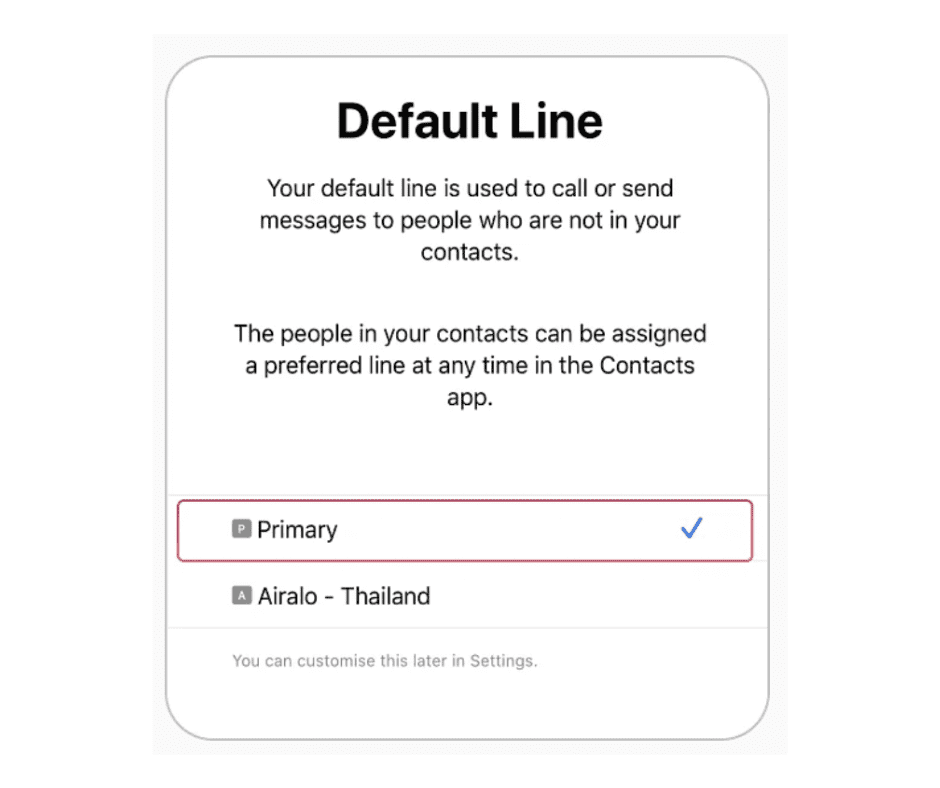
iMessage and FaceTime: You’ll want to select your “primary” plan again in the “Add to iMessage, FaceTime and Apple ID” so you can continue to use your main phone number with those services.
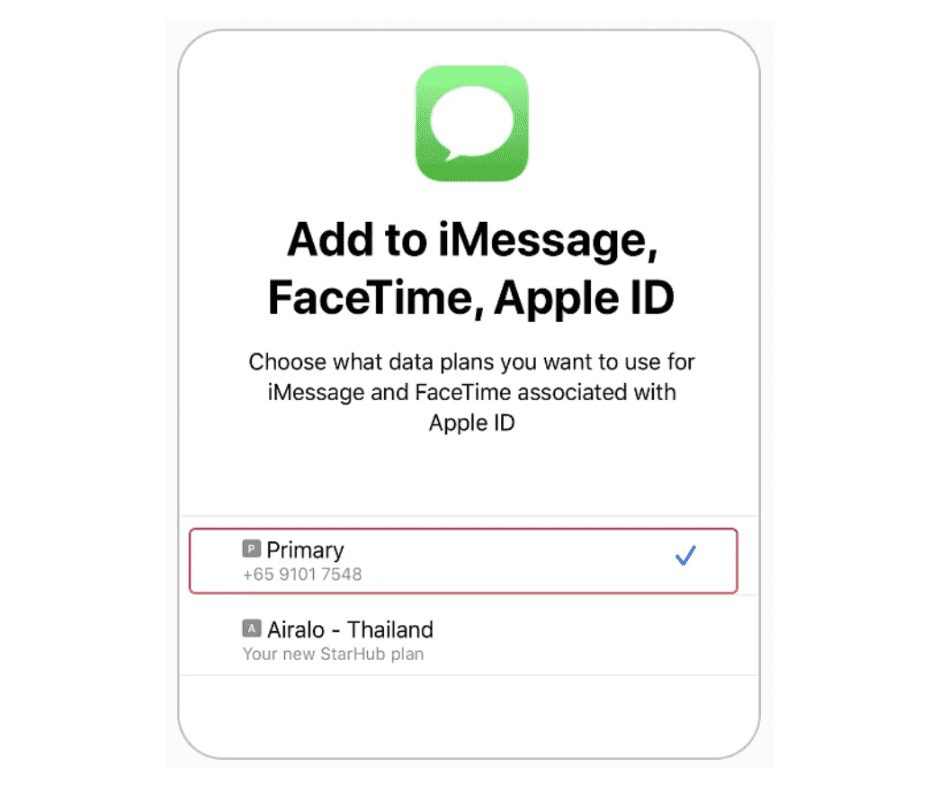
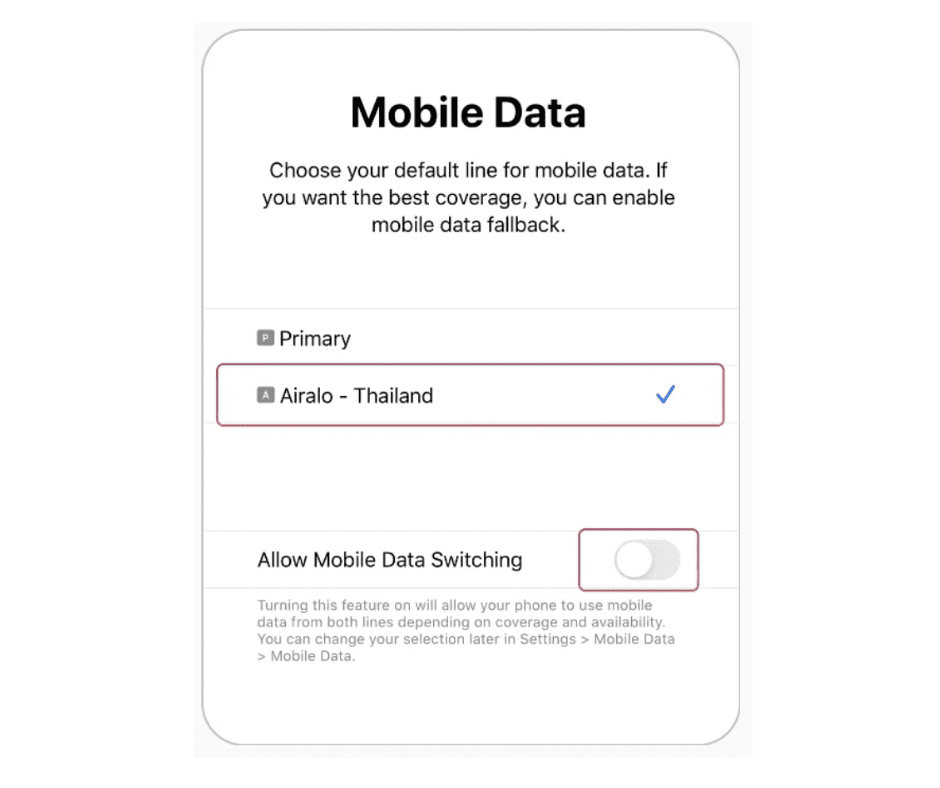
Mobile Data: Next, you’ll want to choose your Airalo eSIM card (the one you just labeled) as your mobile data line. Make sure to turn off the “Allow Mobile Data Switching” button. This will make sure that you are only using data from the Airalo eSIM and not from your traditional plan. Otherwise, if you run out of data or if something isn’t working with the Airalo plan, it’ll simply switch back to your normal data plan and you’ll likely end up incurring high roaming bills.
You can do all of this from anywhere in the world, regardless of the eSIM location you purchased, and it won’t start until you’re in the country and have turned on your eSIM.
Step 5: Turn On Your eSIM
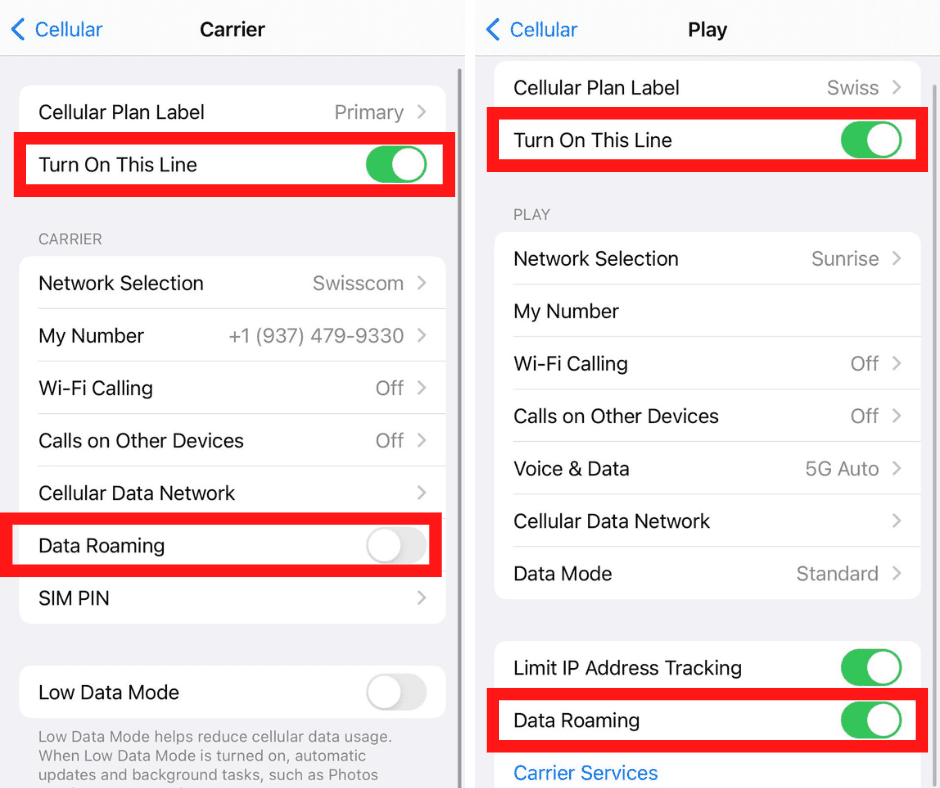
Once you’re done installing the eSIM and you’re in the location selected, you can go ahead and turn on your eSIM. You can do this by going to Settings > Cellular > choose the eSIM you purchased > Turn On This Line.
For all of the eSIMs I’ve used, data roaming needs to be turned on.
One thing I had an issue with at the beginning when I was in Serbia was that it wasn’t connecting to the correct network. Airalo will sometimes tell you what network you’ll have to connect to (in my case, Sunrise). It generally connects automatically, but if it doesn’t, just turn off the “automatic” option and choose the correct one of the networks listed. If it doesn’t come up, google the name because sometimes they may not match exactly.
Step 6: Make Sure It Works
Once you’re done, you’ll want to triple-check that your travel phone plan is working and listed correctly.
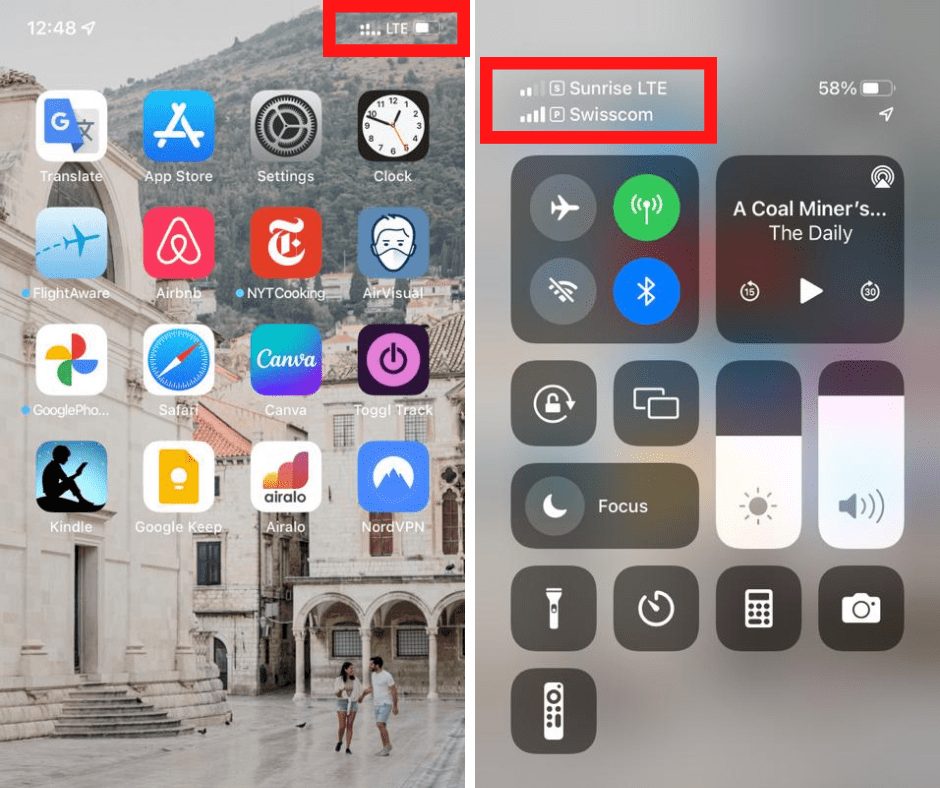
Strength of Carrier: The icons at the top right of the screen will show the strength of the signal. You can also swipe down to see more status icons. If you’re on WiFi, you can sign out briefly to make sure it works.
Primary Line: Make sure everything is checked correctly for your primary line by going to Settings > Cellular > Cellular Plans > Primary. The Primary line should be on and data roaming should be off.
Airalo Line: Make sure everything is checked correctly for your Airalo line by going to Settings > Cellular. There, you should see your eSIM is enabled for data under Cellular Date. After, go to Cellular Plans > Airalo (in my case, “Swiss”). The line should be on and data roaming should be on as well.
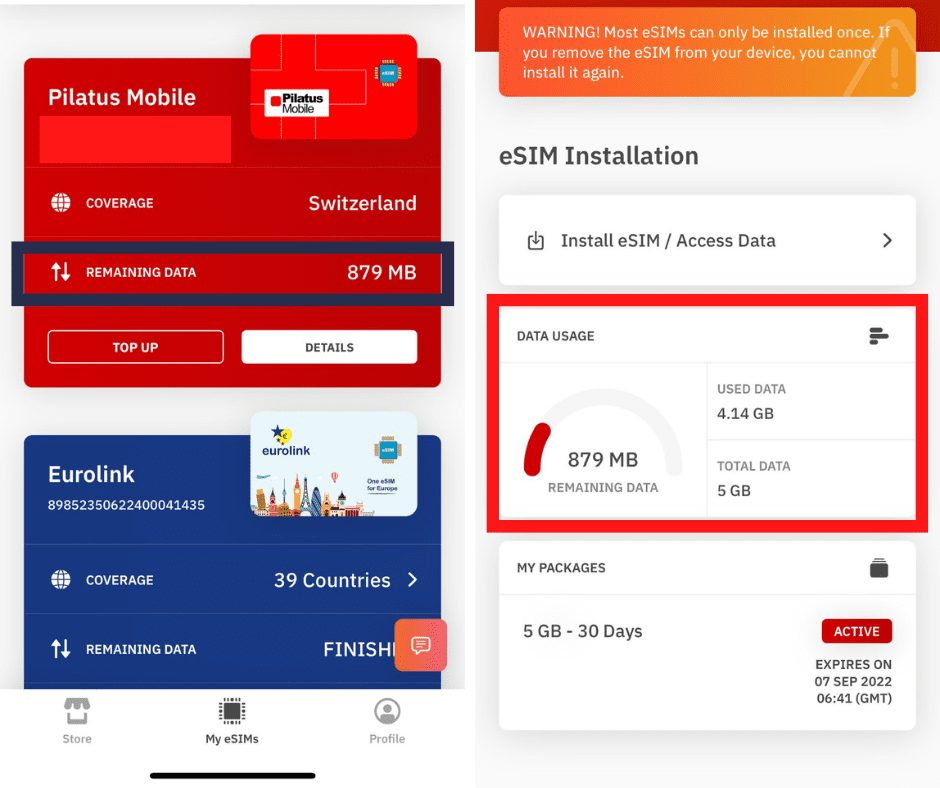
And as time progresses, you can easily check how much data you have left directly on the app. Simply go to “my eSIMS’ and you’ll notice how much data you have left. From there, you can also click “top up” to add additional data or time to your plan.
If something isn’t working, you can always contact Airalo here. They are quick to respond and eager to help and ensure your service is working smoothly and quickly.
Tips For Digital Nomads
The thing to keep in mind with Airalo is that you still need a primary line, as the eSIM won’t provide you with a phone number. If you’re a digital nomad and want to keep your US phone number without paying expensive fees through traditional providers, our recommendation is to go with Google Fi.
They offer different plans, anywhere from only unlimited calls and texts or unlimited data. When we first moved abroad in 2019, we actually switched everything to Google Fi. We had both our cell service and data through them. It worked quite well and was convenient, but it was quite expensive (generally around $150 per month for the two of us).
We then learned that Google Fi is meant to be used primarily in the United States, and we were notified that since we were predominantly abroad, our data service would be suspended.
We were able to keep our numbers, and calls and texts were not impacted, but we no longer had data. But, that’s when we found Airalo. Now, we pay Google Fi $35 per month for the two of us to keep our number, and we use Airalo for data. We can generally get away with 5 GB or 10 GB per month (depending on usage), which is then another $15-$20 per person a month.
So, in short, we’re now saving about $80 per month. We have been truly pleased with this setup and quite happy that we found Airlao.
Still have questions and looking for more information on Airalo and its services? Click here for more.
Save for Later? Pin It!
